Where Do Oven Racks Go? A Practical Guide to Placement
Learn where oven racks go for even heat, safe handling, and efficient cooking. This Stove Recipe Hub guide covers rack positions by task, safety tips, and maintenance for home cooks.

Goal: Place oven racks so heat rises evenly and food browns predictably. Start with the middle rack for most baking, use the bottom rack for roasting, and the top rack for broiling or quick browning. Leave space for air flow and avoid touching the oven walls. Check manufacturer guidance if rack heights differ.
Why the Right Rack Placement Matters
If you’re asking where do oven racks go, the answer hinges on heat flow, airflow, and the recipe’s requirements. The rack position determines browning, moisture distribution, and how quickly air circulates around your dish. Placing a rack too close to the top or bottom can lead to uneven cooking, scorching on one side, or undercooking another. By understanding the basics of rack placement, you’ll enjoy more predictable results and fewer kitchen surprises. Throughout this guide, we’ll reference common tasks home cooks perform on the stove and in the oven, so you have a practical, repeatable framework you can rely on week after week.
Rack Position by Cooking Task
Most baking projects benefit from a middle rack because it offers balanced heat from both the upper and lower elements. For roasting meats or vegetables that you want browning on multiple sides, start with the bottom rack to bring out deeper caramelization, and keep an eye on airflow to avoid steam buildup. For broiling or quick browning on top, the top rack is ideal, but monitor closely to prevent scorching. If you’re baking multiple sheets, use the middle rack and stagger pans so they don’t block heat from reaching each tray. When in doubt, follow the recipe’s guidance and test with a small batch first to dial in your rack height.
How to Adjust Rack Height Safely
Always ensure the oven is off and has cooled before touching racks. Gently pull the rack out by gripping both sides with a gloved hand, then lift it out straight to avoid tipping. When positioning a rack, align it so it sits securely on the rails and won’t tip when loaded. Slide it back in slowly, keeping your hands clear of hot surfaces. If your oven has a convection setting, leave appropriate space between trays to allow air to circulate around each dish. These steps help prevent burns and maintain even cooking.
Common Mistakes and Safety Considerations
A frequent mistake is placing a rack too close to the oven walls, which restricts air flow and can cause hot spots. Another is attempting to load heavy pans on a rack that looks bent or damaged—this can cause the rack to warp or fail. Never place plastic or non-oven-safe items on racks. Always use oven mitts or heat-resistant gloves, and avoid reaching inside a hot oven unless you are certain the interior is safe and clear of heat sources. Finally, never adjust rack height while the oven is on or hot; wait until it’s cool and then reposition.
Multi-Rack Cooking: Planning and Safety
If your recipe calls for multiple racks, plan the layout before preheating. Place dishes with similar cooking times on different levels to improve airflow and avoid overcrowding. Ensure there is at least 1-2 inches of space between pans and between the pans and the oven walls. Use the middle rack as a baseline for most multi-rack cooking, then adjust up or down based on browning or moisture needs. Rotate pans halfway through cooking if your oven performs unevenly.
Cleaning and Maintenance After Placement
Regular maintenance helps racks slide smoothly and heat evenly. After cooking, let racks cool completely before removing and cleaning them with warm, soapy water or a non-abrasive cleaner. Rinse thoroughly and dry before reinserting. If racks stick, apply a small amount of cooking oil to the rails and wipe away any excess. Inspect racks for corrosion, warping, or loose rails and replace them if needed. Proper care prevents performance issues and extends rack life.
Practical Tips for Different Oven Types
Gas ovens rely on gas flames beneath the rack, so keep pans slightly lower to avoid flare-ups while still allowing heat to reach the dish. Electric ovens distribute heat differently; you may notice more pronounced hot spots in older models, so use a thermometer to verify even cooking across racks. Convection ovens often benefit from higher airflow; avoid crowding and consider using the middle rack for the best balance of heat and air movement. Always consult your oven manual for model-specific guidance.
Visual Cues: Airflow, Heat, and Browning
Look for even browning on foods and consistent internal temperatures when baking. If you notice one tray browning faster than another, switch their positions between racks or rotate the trays during cooking. A well-placed rack should also allow the oven’s vents and fans to do their jobs without obstruction. Remember: airflow is your ally for even cooking, so never block vents with heavy pans or multiple layers of foil.
When to Replace Racks or Rails
Racks and their rails wear out with use. If you notice persistent sticking, loose rails, or cracking near the ends, it may be time to replace them. Damaged racks can warp under heat and fail to support heavy pans, creating a safety risk. Keep a spare rack on hand for busy cooking days and check fit regularly to ensure safe operation.
Quick Reference Cheatsheet
- Middle rack for most baking.
- Bottom rack for roasting.
- Top rack for broiling.
- Leave 1–2 inches of clearance around pans.
- Use oven mitts; confirm the rack is secure before cooking.
- Refer to the oven manual for model-specific rack configurations.
Tools & Materials
- Oven rack(s)(Check that you have the correct size/number for your oven model)
- Heat-resistant gloves or oven mitts(Protect hands when handling hot racks)
- Oven manual or rack height chart(Model-specific guidance can differ)
- Kitchen towel or silicone mat(Protect surfaces and catch drips when removing hot racks)
- Good lighting(Helps inspect rack alignment inside dark ovens)
Steps
Estimated time: 10-15 minutes
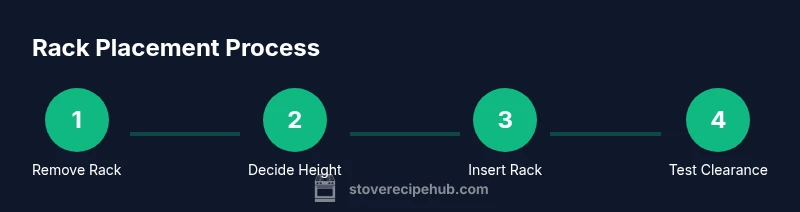
- 1
Remove the rack safely
With the oven cool, grip the rack on both sides and pull it straight out. Do not twist or yank, which could bend the rails or spill hot contents. Place the rack on a heat-resistant surface.
Tip: Use two hands and keep wrists straight to avoid tipping the rack. - 2
Decide rack height based on task
Assess whether you need even baking, browning, or roasting. For most baking, start with the middle. For roasting or crispy edges, choose bottom or a lower position. If unsure, place in the middle and monitor.
Tip: When unsure, aim for the middle and adjust if needed during prep next time. - 3
Insert rack and align with rails
Slide the rack back into the oven, ensuring it sits evenly on both rails. Do not force it past a tight bend or jam. Confirm it is level and sits flat.
Tip: Listen for a gentle click when rails engage; don’t force it through resistance. - 4
Return rack to planned position
Place the rack at the chosen height and push it fully back so it won’t tilt when loading pans. Keep a safe distance from the oven walls to avoid heat contact.
Tip: Re-check clearance around the rack after loading food. - 5
Test clearance and adjust if necessary
Before turning on heat, confirm there is at least 1 inch of space between food and the oven walls and between racks. If you notice crowding, reposition to improve airflow.
Tip: Always use the oven’s manual for recommended spacing on your model.
Common Questions
What is the safest rack height for beginners?
For most recipes, the middle rack offers balanced heat and the least risk of scorching. Beginners should start here and adjust based on the recipe’s browning needs.
For beginners, start with the middle rack for balanced heat and adjust if browning isn’t even.
Can I use more than one rack at a time?
Yes, multi-rack cooking is common. Leave space between pans and avoid crowding. Rotate pans if your oven cooks unevenly.
Yes, you can use multiple racks. Leave space and rotate if temps are uneven.
Should I move racks while the oven is hot?
No. Wait for the oven to cool before repositioning racks to prevent burns and bent rails.
Do not move racks when the oven is hot; wait until it’s cool.
What if a rack won’t slide in smoothly?
Check for obstructions, ensure the rails are clean, and verify the rack is correctly aligned. Do not force it.
If a rack sticks, stop and inspect the rails and alignment.
Are there racks specifically for convection ovens?
Convection ovens rely on airflow, so keep racks evenly spaced and avoid stacking pans tightly. Follow your model’s instructions for optimal performance.
Yes, follow your model’s guidance for convection racks and spacing.
How do I know if a rack is properly installed?
The rack should sit level on the rails, be easily removable, and hold pans without wobbling. If unsure, recheck alignment.
A properly installed rack sits level, wobbles-free, and slides out easily.
Watch Video
Top Takeaways
- Place middle rack for most baking tasks.
- Bottom rack enhances roasting browning and flavor.
- Top rack is best for broiling and quick browning.
- Ensure adequate air flow and clearance around pans.
- Consult the oven manual for model-specific rack guidance.