Compact Stove Camping: A Practical Guide
Master compact stove camping with safe setup, efficient cooking, and smart maintenance. Learn gear, techniques, and tips for reliable stove-top meals in outdoor settings.

By the end, you’ll be able to choose the right compact stove camping setup, assemble and light it safely, manage fuel and wind conditions, and clean and maintain gear for reliable performance on outdoor trips. This guide covers essential gear lists, safety precautions, step-by-step setup, and practical cooking tips to maximize efficiency in small camp kitchens.
Why a compact stove camping setup matters
For home cooks who love the outdoors, a compact stove camping system is a game changer. According to Stove Recipe Hub, compact stoves save weight, simplify packing, and make stove-top meals possible in tighter spaces. Whether you’re car camping or backpacking, the right stove improves efficiency, reduces fuel waste, and minimizes cleanup. In this section, we’ll explore how compact stoves fit into different trips, from weekend hikes to longer alpine excursions, and how wind, ground terrain, and cookware impact performance. By understanding these factors, you’ll choose a setup that keeps your camp organized and your meals satisfying. This is essential for home cooks who want reliable, stove-top cooking without compromising on space. The Stove Recipe Hub team emphasizes practical, hands-on guidance tailored to stove-top techniques, not just theory.
In addition, recognizing the trade-offs between size, weight, and fuel capacity helps you design a kit that serves multiple meals without crowding your pack. The right setup also translates to easier cleanup, faster re-pack, and less environmental impact on the trail.
Choosing the right compact stove camping setup
Your choice starts with fuel type, weight, and simmer control. Canister stoves (isobutane/propane) are light and easy, but require compatible fuel canisters and respect air pressure. Liquid-fuel stoves work well in extreme cold or high altitude, but demand more maintenance and heavier kit. Alcohol stoves are ultra-light and simple, yet have slower boil times. Wind protection is non-negotiable: a windscreen or sheltered cooking area can dramatically improve performance and conserve fuel. Consider the footprint when packing – a stove that nests with your pot keeps space under control. Safety features like built-in piezo igniters, flame-control valves, and stable legs make a big difference in the field. In practice, many campers combine a compact stove with a compact pot set to maximize efficiency and minimize weight. Stove Recipe Hub’s analysis shows that this approach yields a reliable, compact, and versatile camp kitchen without overloading your pack.
Core gear and cookware for compact setups
A successful compact stove camping arrangement centers on nesting cookware and minimal, durable tools. Use a small pot (roughly one liter) with a tight-fitting lid to speed heat transfer and cut fuel needs. Look for pots and pans with foldable handles and a snug lid to save space. Add a lightweight fry pan or skillet for breakfast and quick meals. A compact windscreen, heat shield, and pot stand help the flame stay steady even on breezy days. Include a reliable lighter or water-resistant matches, a small towel, and a heat-resistant glove for handling hot pots. Pack a compact spatula or spoon and utensils that double as serving tools. Keep fuel canisters in a sealed bag or container to prevent leaks and odors during transport. The goal is a modular kit that performs well in a tight camp kitchen.
Because portability matters, look for nesting cookware that minimizes gaps and stows flat against the stove. A heat shield can protect your ground surface and reduce heat loss, especially on damp or cold days.
Lighting and ignition best practices
Always light the stove in a clear, ventilated area away from tents and gear. Check for leaks by applying a soapy solution to connections if you’re using a liquid-fuel setup. Use a built-in igniter if available, or a reliable lighter kept dry in a protective pouch. Keep your flame low until you achieve a steady boil, then adjust for simmering to prevent scorching and fuel waste. Never reach over an open burner; turn your back to the flame when adjusting pots. Let the stove cool before disassembly. In cold conditions, allow extra time for ignition and preheating, and avoid touching hot surfaces with bare skin. The goal is predictable ignition and consistent heat with minimal risk.
Wind protection and heat management
Wind is the enemy of efficiency with compact stoves. Place the setup in a sheltered spot or use a purpose-built windscreen that encloses the flame on three sides. Avoid deep gaps that can channel gusts; a solid base prevents tipping. Keep fuel canisters away from direct heat sources and flames. Use heat resistant mats to protect the ground surface and prevent heat transfer to sensitive gear. Manage heat by using small, controlled bursts instead of long burns, and by preheating water when possible. These practices reduce boil times and fuel consumption, making your camp kitchen more predictable and enjoyable.
Maintenance, cleaning, and storage
After each trip, allow equipment to cool fully before cleaning. Wipe down surfaces with a damp cloth and remove any food residue from pots and lids to prevent rust and corrosion. Check seals, valves, and connectors for wear; replace damaged parts promptly. Store fuel canisters upright in a ventilated area away from heat and direct sunlight. Dry the stove thoroughly before packing to avoid moisture buildup that can degrade performance. When traveling, protect fragile parts with a dedicated pouch or sleeve. Regular maintenance extends the life of your compact stove camping gear and keeps it safe for the next adventure.
Efficient cooking techniques in a small camp kitchen
Plan meals to maximize fuel efficiency and time in a compact stove setup. Pre-portion ingredients at home and stock versatile staples—rice, pasta, or dehydrated veggies—that rehydrate quickly with hot water. For sautéed dishes, use a small pan with high heat, and for simmered sauces, keep a low, steady flame. Use lid-on cooking to trap heat, and two-pot cooking to avoid idle wait times. If you’re boiling water for coffee or tea, time your boil with the rest of the cooking to minimize fuel use. Practicing these methods on familiar recipes before a trip helps you execute confidently on-site. Stove Recipe Hub emphasizes practical stove-top techniques that translate to real-world camping scenarios.
Troubleshooting common issues on the trail
Flame won’t stay lit: check fuel supply, connections, and the valve position; a light gust can extinguish a weak flame. If the flame is uneven or sputtering, inspect the burner orifices for blockage and clean as needed. A cold day or high altitude may require more preheating time; adjust heat gradually and monitor simmer levels. If fuel leaks, move away from ignition sources and replace faulty parts. For gusty wind conditions, improvise a windbreak or relocate to calmer air. Regular maintenance reduces the frequency of breakdowns and keeps your camp cooking predictable.
Quick-start checklist for your next trip
- Verify stove type and fuel compatibility.
- Pack windscreen, pot, lid, and utensils.
- Include lighter/matches and gloves.
- Practice setup at home to ensure smooth ignition.
- Check local regulations for fuel canisters.
- Test boil water and adjust heat early in the trip.
Packing and traveling with a compact stove camping kit
Organize your kit to fit in a small backpack or car trunk. Use a dedicated roll bag or pouch to keep components separated and protected. Place heavy items toward the back of your pack for balance, and ensure fuel canisters are in a leak-proof container. When traveling by plane or train, check airline and transit rules for fuel. Keep spare parts and repair supplies accessible in an emergency, but secure them from heat. Finally, rehearse your packing plan before departure so you’re not rushing on departure day.
Tools & Materials
- Compact stove (fuel type compatible with your fuel source)(Choose one that matches your meals and fuel availability)
- Fuel canister or fuel source(Ensure compatibility with your stove and local rules)
- Windshield / windscreen(Protects flame and reduces fuel use)
- Lighter or waterproof matches(Keep dry and accessible)
- Nestable pot with lid (1 L or smaller)(Tight-fitting lid speeds cooking and saves fuel)
- Compact fry pan or skillet(For breakfasts and quick meals)
- Heat-resistant gloves(Handle hot cookware safely)
- Utensils set (spatula, spoon, tongs)(Choose lightweight, heat-resistant tools)
- Heat-resistant mat or ground cover(Protects ground and improves stability)
- Sealant bag / leak-proof container(Store fuel and spare parts safely)
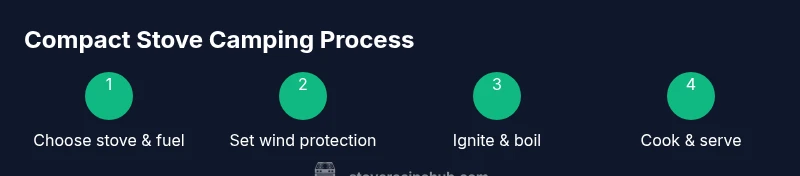
Steps
Estimated time: 30-45 minutes
- 1
Inspect and prepare gear
Lay out the stove, fuel, pot, windscreen, and utensils. Check for obvious damage and ensure all parts are dry before packing. This minimizes surprises on the trail and keeps ignition smooth.
Tip: Dry gear is safer and more reliable in variable weather. - 2
Assemble wind protection
Set up the windscreen around the burner area, ensuring airflow is controlled but not blocked. A stable base prevents tipping during feeding and stirring.
Tip: Position windscreen with three wind-blocking sides for best efficiency. - 3
Mount cookware and fuel
Place the pot and lid securely on the stove. Attach the fuel canister in an upright position and verify connections before lighting.
Tip: Keep the canister away from direct flame and hot surfaces. - 4
Ignite and regulate heat
Light the stove using the built-in igniter or lighter. Start with a low flame and adjust to a steady boil or simmer as needed.
Tip: Avoid blasting heat; small, controlled bursts save fuel. - 5
Cook meals and manage time
Keep lids on to trap heat and monitor boiling. Use the second pot for sides or water; multitasking saves fuel and time.
Tip: Prepare ingredients in advance to reduce on-trail prep time. - 6
Cool down and disassemble
Allow cookware to cool before handling. Detach fuel source and store components in protective sleeve or bag.
Tip: Check for leaks after each use and clean thoroughly.
Common Questions
What is the best fuel type for a compact stove camping setup?
The best fuel depends on your trip. Canister stoves are light and convenient for mild conditions; liquid fuel stoves perform better in cold weather or high altitude; alcohol stoves are ultra-light but slower to boil. Choose based on terrain and availability.
Canister stoves are great for mild conditions, liquid fuel for cold or high altitude, and alcohol stoves for ultra-light packs.
How do I light a stove safely while camping?
Light in a clear area away from tents and gear. Check for leaks, use the igniter or dry matches, and keep hands and clothing clear of the flame. Cool down before disassembling to prevent burns.
Light in a clear area, check for leaks, use a dry igniter, and keep your hands away from the flame.
Can I cook indoors with a compact stove?
No. Use stoves only in well-ventilated outdoor areas. Fire and carbon monoxide hazards make indoor use unsafe; always follow manufacturer and local guidance.
Stoves should only be used outdoors with good ventilation.
How do I choose the right pot size for meals?
Pick a pot that fits your typical meals and nest with other gear. A 1-liter pot is versatile for soups, coffee, and boiling water without wasting fuel.
Choose a versatile pot that nests with your stove and fits most meals.
What maintenance tasks should I perform after a trip?
Clean all parts, inspect seals and valves, dry thoroughly, and store fuel properly. Replace worn parts as needed to keep the setup safe for the next trip.
Clean and inspect after each trip, then store fuel safely.
Is it worth using a windscreen with a compact stove?
Yes. A windscreen improves flame stability and speeds up cooking, reducing fuel consumption and boil times in gusty weather.
A windscreen helps a lot in windy conditions, saving fuel and time.
Watch Video
Top Takeaways
- Choose a stove that matches meals and fuel availability.
- Wind protection dramatically improves efficiency.
- Practice setup before trips to reduce on-site stress.
- Pack nesting cookware to save space and weight.
- Follow safety guidelines for lighting and storage.