How to Check a Kitchen Stove for Gas Leaks: Step-by-Step Guide
Learn safe, step-by-step methods to check your stove for gas leaks. This Stove Recipe Hub guide covers safety, testing, and what to do if you detect a leak. Stay safe and avoid ignition during testing.

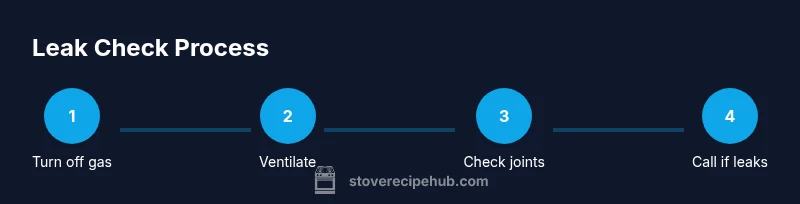
According to Stove Recipe Hub, start by ensuring ventilation and opening exterior doors. Do not ignite flames during the check. Sniff for gas and listen for a hiss, then inspect visible connections. Apply a soap-and-water solution to joints to spot bubbles. If you smell gas or see bubbles, evacuate and call emergency services.
Safety first: immediate precautions and what not to do
Gas leaks are serious hazards. Before you begin any inspection, ensure there is adequate ventilation and remove ignition sources from the area. According to Stove Recipe Hub, never test for leaks with flames or electrical devices that could spark. If you smell gas, leave the area immediately, avoiding purses and pets, and call emergency services from a safe location. Do not re-enter until responders declare it safe. Keep a clear path to an outside exit and have the gas shut-off valve accessible. Remember, regulators and hoses can wear out over time, so routine checks are wise for households that rely on gas stoves. Document any odors or signs you observe for a professional visit later. Maintain calm and avoid panic, which can lead to rushed decisions.
Quick space prep and ventilation before testing
Prepare the area by clearing away combustibles and ensuring good air flow. Open a door or window on the kitchen side opposite the stove to encourage cross-ventilation, and run any ventilation hood that operates without using the stove. Remove towels, cloths, and items stored nearby that could trap heat or odors. Place a flashlight nearby to inspect tight spots, and have a soap solution ready. Avoid turning on fans or lights that could create sparks or static; you want air movement without introducing ignition risks. If you have a gas detector, keep it handy as a supplementary check, but remember it does not replace a visual and soapy test.
Visual and smell cues you should inspect
Carefully examine visible gas lines, fittings, and hoses for signs of wear, cracking, or discoloration. A gas odor—often described as rotten eggs—signals a potential leak and should be treated seriously. Listen for a faint hissing sound near connections when the room is quiet. Do not rely on one cue alone; use multiple indicators (smell, sound, sight) to guide your actions. If anything seems off, treat it as a potential leak and proceed with caution. Keep pets away and ensure a clear escape route in case you need to evacuate quickly.
Safe testing methods you can perform without ignition
The safest approach is to perform leak checks with the gas off and no flames or spark sources nearby. If possible, access and turn off the gas supply at the appliance valve to depressurize the line before testing. Visually inspect all joints and hoses, then apply a non-caustic soap solution to joints and connections to observe bubbles. Do not operate burners or create any ignition sources during the test. If you cannot access the valve or you are unsure about the setup, postpone testing and seek professional guidance. This approach minimizes the risk of ignition while you verify the integrity of connections.
How to use soapy water or detector to spot leaks
Mix dish soap with water until it forms a stable solution, then apply generously to all joints, including where the hose connects to the stove and to any wall pipe connections. Watch carefully for persistent bubbles that appear over several seconds; even small bubbles indicate a leak. If no bubbles form, the joint is likely secure, but re-check after turning the gas back on if you need to test again. Handheld gas detectors can provide an additional layer of confirmation in well-ventilated spaces, but they should not replace the soap test entirely. Always use soap testing as your primary on-site method for surface-level checks.
Interpreting results and the next steps after testing
A bubbled joint or visible gas odor indicates a leak and requires immediate action. If you detect a leak, shut off the gas at the main valve, ventilate the space, and contact your gas supplier or a licensed technician. If you don’t find bubbles but still smell gas or feel unsure, evacuate and call emergency services. Do not attempt DIY repairs on gas lines or regulators; leaks mean equipment is compromised and needs professional servicing. After the all-clear from authorities, arrange a thorough inspection and, if needed, part replacements to restore safe operation.
What to do if you detect a leak or suspect damage
If you detect a leak, leave the area immediately and avoid using any switches, lights, or appliances that could create a spark. Call your gas utility’s emergency line or local fire department from a safe location. Do not re-enter until responders tell you it is safe. If you cannot identify the source, or if the area remains hazy or you hear a persistent hiss, treat it as a major emergency. After safety is established, have a qualified technician inspect the entire gas appliance system, including valves, hoses, regulators, and the connection to the gas supply.
Maintenance tips to reduce future leak risk
Regular maintenance reduces the likelihood of leaks. Schedule periodic inspections by a licensed professional, especially after any noticeable changes in odor or operation. Keep gas lines and connections free from clutter, protect hoses from heat sources, and replace worn components per manufacturer guidelines. When performing DIY checks, avoid extensions or modifications to gas lines, and never use you see a damaged portion as a reason to continue operation. Keeping a clean, well-ventilated kitchen and documenting any changes helps catch issues early.
When to call a professional and what to expect
If testing reveals a leak or you suspect damage, call a licensed gas technician or your gas supplier for a home safety assessment. Professionals will perform a comprehensive inspection, pressure tests, and leak detection with appropriate equipment. Do not attempt to repair gas lines yourself; issues may involve the regulator, flexible hoses, or the piping network behind walls. Expect a safety guard to be installed if needed and guidance on replacing any compromised parts. Regular maintenance after repairs helps prevent future leaks.
Common myths vs. reality about gas leaks on stoves
Myth: You can rely on a strong smell alone to confirm a leak. Reality: Odor is a warning sign, but leaks can occur without a noticeable smell or may be in unseen areas. Myth: Gas leaks are rare and not urgent. Reality: Gas leaks are serious and require quick action. Myth: Soap bubbles guarantee safety. Reality: Bubbles confirm leaks at tested joints, but unseen leaks demand professional assessment. Myth: A quick DIY fix is sufficient. Reality: Most gas-line issues require licensed technicians for safe repair.
Tools & Materials
- Soap and water solution (dish soap + water)(Apply with a spray bottle or brush to joints and connections.)
- Gas shut-off wrench or suitable tool(For turning off the valve if needed.)
- Flashlight(To inspect dim corners and behind appliances.)
- Rags or paper towels(For cleaning and drying joints after testing.)
- Gas detector pen (optional)(Provides quick readings; not a substitute for soapy tests.)
- Ventilation aids (doors/windows openers or fans) (optional)(Promotes air flow without creating ignition risk.)
Steps
Estimated time: 20-30 minutes
- 1
Shut off the gas supply
Locate the appliance shut-off valve near the stove and turn it clockwise until it stops. This isolates the stove from the gas line and reduces the risk of a leak during inspection. If you cannot reach the valve safely, skip this step and move to ventilating with caution.
Tip: Use a flashlight to locate the valve; never force a stuck valve. - 2
Ventilate the area
Open exterior doors or windows to create cross-ventilation. Turn on any non-spark-producing ventilation in the kitchen. Keep the space clear of clutter so you can exit quickly if needed. Do not operate electrical devices or switches that could spark.
Tip: Ventilation should continue for several minutes after testing to disperse any gas. - 3
Inspect visible lines and connections
Carefully examine hoses, fittings, and pipe joints for wear, cracks, or corrosion. Look behind the stove and under cabinets where leaks often hide. Do not touch any hot surfaces or force components that look damaged.
Tip: If a joint is hard to reach, avoid leaning over burners; use extended tools if necessary. - 4
Apply soapy solution to joints
Spray or brush the soap solution onto all joints and connections, including the shut-off valve if accessible. Watch for bubbles that persist for several seconds. If bubbles appear, mark the area and avoid using the stove until fixed.
Tip: Test in a well-ventilated space and wipe away foam to recheck spots. - 5
Interpret results
If bubbles form or you notice gas odor, treat it as a leak and take action immediately. If there are no bubbles, the joint is likely secure, but consider repeating the test after gas is restored to confirm.
Tip: Always err on the side of caution; when in doubt, assume a leak and evacuate. - 6
Take action if a leak is found
Shut off the gas at the main valve, leave the area, and call your gas provider or a licensed technician. Do not attempt a repair yourself. If the environment remains unsafe or gas is strongly detected, call emergency services.
Tip: Keep a clear escape route and inform others in the household immediately. - 7
Restore gas and re-test safely
Only reintroduce gas after a professional confirms the system is safe. Re-test a second time following professional guidance to ensure the leak is resolved and the area is ventilated.
Tip: Document the service report for future reference.
Common Questions
What should I do immediately if I smell gas?
If you smell gas, leave the area immediately and call the gas emergency line or local authorities from a safe location. Do not operate switches or flames during exit. Once safe, contact a professional to assess the stove and integrity of the gas line.
If you smell gas, evacuate immediately and call emergency services from a safe location. Do not switch on lights or use any devices until the area is declared safe by authorities.
Can I test for leaks with the stove on?
No. Testing should be done with the area free of ignition sources. If the stove is on or the gas is flowing, the risk of ignition or explosion increases. Always shut off the gas and test cautiously following safety guidelines.
Testing with the stove on is not safe. Shut off gas and test only when there are no flames or sparks present.
Is a soap solution reliable for detecting leaks?
Soap solution is a practical, quick check for visible joints and connections. It can reveal bubbles indicating leaks, but it’s not a guarantee for unseen leaks. Always supplement with professional inspection if there are any doubts.
Soap bubbles show leaks at tested joints, but unseen leaks may still exist; get professional help if anything seems off.
When should I call a professional?
Call a professional if you detect a leak, cannot locate the leak source, or are unsure about a safe approach. A licensed technician will verify the system and ensure all components meet safety standards.
Call a licensed technician if you detect a leak or are unsure about the safety of the stove.
How often should I test for leaks?
Test frequency depends on usage and maintenance history. Consider testing after moving the stove, after repairs, or as part of a routine annual safety check by a professional.
Test after moving the stove, after repairs, or during annual safety checks by a professional.
Are there common myths about gas leaks I should ignore?
Common myths include that smells are always present or that minor bubbles are harmless. Reality: leaks require caution and professional assessment, as some leaks are not easily detectable by smell alone.
Gas leaks aren't always obvious; treat any sign as serious and get a professional check.
Watch Video
Top Takeaways
- Test only with gas off and extinguished flames
- Use soapy water to reveal leaks at joints
- Evacuate and call professionals if a leak is detected
- Never attempt DIY gas-line repairs
- Ventilate and document findings for follow-up
- Schedule professional maintenance to reduce future risk