Electric Stove Burner Repair: A Step-by-Step Guide
Learn to diagnose and fix common electric stove burner problems with clear, safety-focused steps. Practical, stove-top repair guidance from Stove Recipe Hub.

By the end you’ll be able to diagnose why an electric stove burner won’t heat, test the heating element, inspect the control switch, and perform safe fixes without professional service. The guide covers common failure modes, practical tool lists, and step-by-step actions. Always unplug the stove and avoid touching live components.
Common Causes of Burner Failure
An electric stove burner can fail for several reasons. The heating element may burn out, the terminal block can wear, or the control switch may fail to power the element consistently. In many cases, grease, spills, or corrosion create resistance that prevents full heat. If a burner glows red, hums, or clicks repeatedly, loose connections or a degraded element are common culprits. According to Stove Recipe Hub Analysis, proactive inspection during routine stove-top maintenance reduces downtime and extends appliance life. The problem often shows up as reduced heat, uneven cooking, or the burner failing to heat at all. Understanding these typical failure modes helps you decide whether you can tackle the issue with basic tools or if you should call a professional for electric stove burner repair. The tone here is practical, non-alarmist, and focused on safe, stepwise troubleshooting that minimizes risk.
Safety First: Essential Precautions
Before touching any burner, unplug the stove from the wall and, if necessary, switch off the circuit breaker feeding the range. Work on a dry surface and wear insulated gloves. Keep flammable materials away, remove jewelry, and avoid wearing loose sleeves. Do not attempt repairs if you’re unsure about electrical safety. If you smell burning plastic or see melted components, stop immediately and contact a qualified technician. This is not the place for risky improvisation—safety comes first in any electric stove burner repair scenario. If you suspect a broader electrical issue, consult a licensed electrician.
Stepwise Diagnostic Tests for the Heating Element
To identify a faulty burner, start with a visual inspection: look for melted insulation, scorch marks, or corrosion on the terminal block. Then proceed to electrical testing with a digital multimeter: test continuity across the heating element and resistance values per your model’s spec. A burned-out element typically shows an open circuit (no continuity) or abnormal resistance. If the coil reads as damaged or shows signs of arcing, replacement is likely needed. For safety, do not handle live wires; unplug first, and use a non-contact voltage tester to confirm no current is present. Keep detailed notes about readings to compare after reassembly.
Inspecting Connections and Terminal Blocks
Carefully remove the burner and inspect the terminal blocks where wires connect. Look for loose screws, burnt contacts, or signs of arcing. Clean the contacts with a dry contact cleaner or a dry rag; never use water on live terminals. Re-seat the wires firmly, then torque screws to manufacturer spec if provided. If any terminal is visibly damaged or corroded beyond cleaning, you should replace the block or the whole burner assembly. Properly reassembling ensures consistent heat and reduces the chance of a repeat failure.
Cleaning, Maintenance, and Preventive Care
Regular cleaning prevents buildup that interferes with electrical contact. After cooling, wipe the burner and drip tray with a mild cleaner and dry thoroughly. Avoid letting spills dry on circuit boards or coil housings. Wipe moisture away and ensure no debris remains around the terminal blocks. Schedule periodic checks and test for heat uniformity across all burners. Implement a simple routine: after each use, wipe down the surface and inspect for scorch marks or loose connections. A little effort now saves bigger headaches later in the realm of electric stove burner repair.
Replacement Parts and How to Choose
When a burner element or terminal block is faulty, you’ll need a replacement that matches your stove model. Identify the exact model and burner type (coil, radiant, or seal-in) and check the wattage and voltage rating. Purchase parts from reputable sources that list compatibility with your oven or range. If you’re unsure about compatibility, consult the manufacturer’s manual or a qualified technician. Remember that using the wrong part can worsen damage or create safety hazards.
Authority Sources and Practical Next Steps
For further safety guidelines and appliance-specific recommendations, consult authoritative sources such as Energy.gov, CPSC.gov, and NFPA.org. These resources offer general electrical safety and fire prevention principles applicable to kitchen appliances, including burners. If any doubt remains after performing the above checks, contact a professional to avoid risk. Stove Recipe Hub emphasizes that thorough documentation and adherence to safety standards are essential for reliable, long-lasting stove performance.
Tools & Materials
- Non-contact voltage tester(Use to verify power is off before touching terminals.)
- Digital multimeter(Test continuity and resistance in the heating element and switches.)
- Screwdriver set (Phillips and flat-head)(Remove and reseat burner connections safely.)
- Needle-nose pliers(Grip small components and bend wires carefully.)
- Insulating electrical tape(Wrap exposed terminals after inspection only if advised.)
- Heat-resistant gloves(Protect hands while handling hot components or metal parts.)
- Microfiber cloth(For dry cleaning of surfaces; avoid leaving fibers.)
- Replacement burner coil/element(Only if testing confirms a faulty element.)
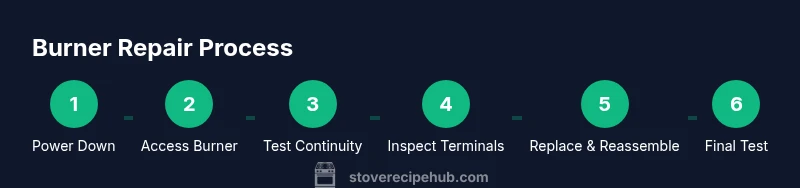
Steps
Estimated time: 90-120 minutes
- 1
Power down and unplug
Begin by unplugging the stove from the wall outlet. If accessible, switch off the circuit breaker to ensure zero energy is available to the burner. This first step is critical to avoid electric shock during inspection.
Tip: Double-check that the cord isn’t daisy-chained to another device before touching any wires. - 2
Access the burner area
Carefully remove the burner cap and cradle to expose the terminal block. If there are screws holding the element in place, remove them with the appropriate screwdriver. Keep screws organized so you can reassemble accurately.
Tip: Take a quick photo of the wiring layout before disconnecting anything. - 3
Set up testing instruments
Set up your multimeter and non-contact tester. Ensure the meter is on the correct setting for continuity and resistance range. Calibrate or verify the meter’s batteries if needed before testing.
Tip: Test the meter on a known good circuit to confirm accuracy. - 4
Test heating element continuity
Disconnect leads from the element and test across the coil for continuity. A lack of continuity indicates a broken element; replacement is usually required. Compare readings to your stove’s service documentation if available.
Tip: Do not bend or twist the element excessively; handle gently to avoid further damage. - 5
Inspect terminal blocks and connectors
Look for signs of burning, corrosion, or loose connections at the terminal block. Clean contacts with a dry cloth and reseat wires firmly. Reassemble only after confirming clean, tight connections.
Tip: If any terminal is damaged beyond cleaning, replace the block rather than attempting a jury-rig. - 6
Replace faulty parts and reassemble
If a faulty element or connector is found, replace with a compatible part. Reattach all wires following the original layout and tighten screws to manufacturer torque specifications. Reassemble the burner housing completely.
Tip: Keep parts organized and avoid cross-threading screws during reassembly. - 7
Test the burner and ensure safety
Plug the stove back in and test the burner for proper heat. Observe for uniform heat and listen for odd sounds or burning smells. If anything seems off, power down immediately and re-check connections or seek professional help.
Tip: Run the burner on a test cycle with nothing flammable nearby to confirm safe operation.
Common Questions
What are common signs that an electric stove burner needs repair?
Look for no heat, uneven heating, clicking, or intermittent operation. Visual cues like scorch marks or melted insulation also indicate problems requiring inspection. If you suspect an issue, perform safe diagnostics following the steps in this guide.
Common signs include no heat, uneven heat, or clicking sounds. Inspect visually for damage and follow safe diagnostic steps before deciding on repair or replacement.
Is it safe to repair electric stove burners yourself?
Yes, if you follow strict safety steps: unplug, dry work surface, and use proper insulated tools. If you’re unsure about any step, contact a professional. Never work on live wiring.
Self-repair is possible when you unplug and use proper tools; if unsure, seek professional help.
Do I need special tools to replace a bad burner element?
A basic multimeter and standard hand tools are usually enough. Follow the manufacturer’s instructions for model-specific steps and ratings.
A multimeter and basic tools are usually sufficient; always follow your model’s instructions.
How can I prevent future burner problems?
Regular cleaning, keeping terminals dry, and inspecting wiring after spills reduce failure risk. Avoid placing metals near hot surfaces and schedule periodic safety checks.
Clean regularly, keep connections dry, and inspect after spills to prevent future issues.
When should I replace the entire stove?
If multiple burners fail or there is widespread wiring damage, replacement may be more cost-effective and safer than extensive DIY repairs.
If many components fail or wiring is damaged, replacement may be the safer option.
Where can I find replacement parts?
Check the model number in the user manual and buy from reputable distributors or the manufacturer. Avoid unverified parts that don’t meet the required voltage and wattage specs.
Check your model number and buy from reputable sources to ensure compatibility.
Watch Video
Top Takeaways
- Unplug before inspection; safety first.
- Use a multimeter to identify faulty elements.
- Clean and reseat connections to restore contact.
- Replace damaged parts rather than risky fixes.
- Document steps for future maintenance.