Replace Stove Element: A Practical Step-by-Step Guide
Learn how to replace stove element safely with practical, step-by-step instructions. This Stove Recipe Hub guide covers tools, compatibility, installation, testing, and maintenance.

You will learn how to replace stove element safely and effectively. Start by turning off power, disconnecting the stove, and gathering the right replacement element that matches your model. This step-by-step process covers safety, parts matching, removal, installation, and testing to restore even heating and extend the life of your appliance.
What is a stove element and why replacement matters
Stove elements are the heat source under your pots, and they come in coil and radiant varieties. When a failure happens, you may need to replace stove element to restore heat. Replacing stove element early helps prevent energy waste, uneven cooking, and the risk of electrical damage. A failed element can show as no heat, inconsistent temperature, buzzing, or visible damage. This guide walks you through how to identify the right part, verify safety, remove the old element, install the new one, and test the results. According to Stove Recipe Hub, addressing small failures early can prevent bigger problems and keep your kitchen functioning smoothly. The recommended approach is to identify the correct replacement part, verify electrical safety, and follow a precise sequence to remove the old element and install the new one. By understanding your stove configuration and the element's mounting, you can minimize downtime and preserve performance. The end result is reliable heat control, improved efficiency, and a safer cooking environment. This section sets the stage for the practical steps that follow, emphasizing that replacement does not have to be daunting when you have the right information and tools.
Tools and safety considerations before you start
Safety is the backbone of any stove repair. Before you touch any electrical component, you must ensure power is completely off. Unplug the unit or switch off the circuit breaker dedicated to the stove, and then test for voltage with a non-contact tester at the control panel and at the element terminal. Wear heat resistant gloves, eye protection, and keep a clear work area free of liquids. Gather the essential tools and replacement element ahead of time to avoid mid-work trips to the toolbox. A dry, well-lit workspace with a stable surface reduces the risk of dropping screws or damaging wiring. Keep a notebook or photo log to document wiring during disassembly so you can reconnect accurately. Do not attempt to repair a damaged insulation sleeve or compromised wiring; if you see melted plastic, scorch marks, or frayed wires, stop and seek professional help. This careful prep reduces risk and lays a clear path for installing the new unit. Safety first keeps your stove running longer and is a key part of the maintenance mindset that Stove Recipe Hub advocates.
Understanding element types and compatibility
Electric stoves use one of several element styles. A coil element is a metal resistor that snaps into a receptacle under the burner pan; a radiant element sits beneath a ceramic surface and uses embedded coils. The choice affects wiring connectors, mounting hardware, and wattage. When replacing, you must match the element type to your model, verify the wattage (often between 1000-3000 watts), and confirm the diameter and mounting configuration. Check the appliance manual or manufacturer label on the cooktop for part numbers and compatibility notes. Some stoves require a specific connector or retaining ring, while others use simple plug-and-play coils. If your stove uses a radiant element, you may need to check the glass-ceramic surface for cracks that could indicate additional repairs. Understanding these distinctions helps prevent a mismatch that would lead to poor heating, electrical noise, or a hazardous failure.
Removing the old element: safety and prep steps
Begin by ensuring the stove is completely powered down. Remove any control knobs and place them in a safe area. Open the access panel if required by your model and locate the element screws or retaining clips. Before touching wires, use a non-contact voltage tester to confirm there is no live current near the terminal block. Label each wire with color and position using masking tape to avoid misconnection. Carefully disconnect the wires from the terminals, taking photos as a reference. Remove the old element from its mounting bracket and inspect the terminal pins for signs of corrosion or heat damage. If you see melted insulation or burnt connectors, the wiring may need replacement. Store the removed element in a safe container for disposal or recycling. This stage reduces risk and lays a clear path for installing the new part.
Installing the new element: alignment and connection
Unpack the replacement element and compare it to the old one for size, wattage, and mounting type. Align the element with the receptacle or bracket and secure it with the original screws or clips. Reconnect the wires to their corresponding terminals exactly as labeled; ensure there is no exposed conductor and that connectors are snug but not overtight. If your unit has a retaining ring or a connector cap, reinstall it per the original configuration. Replace any insulating sleeves or shielding that came with the new part to maintain safe heat management. Before reassembling the control panel, give the area a final visual check for loose wires or stray tools. Reassemble the unit and restore power. You must test on low heat first to observe stable operation. This careful approach minimizes the chance of arcing or miswiring.
Testing the replacement and troubleshooting common issues
With the panel closed and power restored, turn on the burner to a low setting and watch for the element to heat evenly. If there is no heat, recheck connections and confirm the correct terminal mapping. If the element glows but does not heat properly, measure resistance with a multimeter and compare to the typical range for the model. Unusual buzzing, sparking, or a tripping breaker indicates a problem with wiring or the control circuitry. If you observe any of these signs, immediately switch off power and re-examine the connections. Once you confirm proper operation at low heat, gradually test at higher settings and monitor stability. Document results for future maintenance and consider replacing worn wiring or connectors if corrosion or heat damage is visible.
Maintenance tips to extend element life
Regular care extends the life of stove elements. Clean spills promptly after cooling to prevent residue buildup that can heat unevenly. Use appropriate cookware—flat, heavy-bottom pots distribute heat more evenly and reduce hot spots. Avoid banging heavy pans on the element, which can loosen connections or crack the surface. Periodically inspect the terminal area and look for discoloration, corrosion, or loose screws. If you notice persistent heat fluctuation, consult the appliance manual for recommended parts and service intervals. Keeping the cooktop clean and well-maintained supports consistent performance and reflects the practical, hands-on guidance that Stove Recipe Hub emphasizes for stove-top enthusiasts.
Tools & Materials
- Screwdriver set(Phillips and flat head; include at least #2 Phillips and 3/16 inch bits)
- Non-contact voltage tester(Verify no live current before handling terminals)
- Replacement stove element(Match wattage, diameter, and mounting type to your model)
- Heat-resistant gloves(Protect hands when handling hot parts)
- Multimeter or continuity tester(Check resistance and continuity of the circuit)
- Electrical tape(Optional for securing wires or insulating exposed terminals)
- Work light(Ensure the workspace is well lit)
Steps
Estimated time: 45-60 minutes
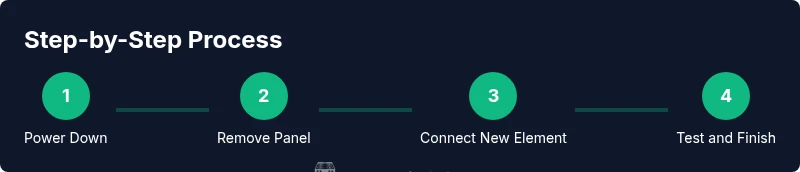
- 1
Power down and confirm no power
Power off at the breaker and unplug if possible. Use a non-contact tester to confirm there is no live current at the control panel and at the terminal block. This prevents electrical shock and arc flash when handling wires.
Tip: Always test twice in case of residual charge. - 2
Access the element and remove mounting
Remove control knobs if present and open the access panel. Locate screws or clips that secure the element and keep a secure workspace for the screws. This step gives you clear access to the connections without disturbing other components.
Tip: Take a quick photo of the setup before disconnecting anything. - 3
Label wires and disconnect old element
Label each wire by position and color before detaching. Disconnect the terminals carefully, avoiding yanking on wires. This labeling ensures correct connections during reassembly.
Tip: Masking tape works well; 2–3 short labels per wire is enough. - 4
Inspect wiring and terminal condition
Inspect terminals for corrosion, wear, or melted insulation. If you observe damaged wires or connectors, plan to replace them or consult a professional. Avoid reusing damaged components.
Tip: If insulation is compromised, stop and replace the affected wiring. - 5
Connect new element to terminals
Attach wires to the correct terminals on the new element. Ensure snug connections and no exposed conductors. Recheck the alignment so the element sits firmly in place.
Tip: Do not overtighten; over-tightening can crack the element housing. - 6
Reassemble and restore power
Reinstall any panels, knobs, and brackets. Restore power and prepare for a test. Confirm that the control area is clean and that nothing is obstructing the element.
Tip: Test with a low heat setting first before using at full power. - 7
Test heat and observe stability
Turn the burner to a low setting and observe heat distribution. If heat is even and stable, gradually increase to higher settings while watching for signs of arcing or instability.
Tip: If anything smells hot or you see sparks, switch off immediately and re-check connections.
Common Questions
Is replacing a stove element a DIY job or should I call a professional?
For coil elements, a confident homeowner can replace stove element by following safety steps and using the correct part. Radiant elements or hard-wired connections may require a professional.
Yes, coil element replacement is usually doable at home if you follow the safety steps; for radiant elements, consider a professional.
How can I tell if the stove element is faulty?
Signs include no heat, uneven heating, buzzing, or visible damage. Use a multimeter to check resistance against the model's specification; open circuits indicate failure.
Look for no heat or buzzing; test with a meter to confirm.
Will replacing the element void my warranty?
Warranty terms vary by brand and model. Check your manual or warranty documentation to see if DIY replacement is allowed.
Check the warranty terms before starting; often it's allowed.
What safety steps are mandatory before starting?
Power off at the breaker, unplug if possible, and verify no voltage in the area with a tester. Wear protective gear and work on a dry surface.
Always unplug and verify no voltage before touching any parts.
How do I choose the correct replacement part?
Match wattage, diameter, and mounting type; verify compatibility with your model; consult the manual or parts diagram.
Match the wattage and fit for your stove model.
Watch Video
Top Takeaways
- Identify correct element type and wattage before purchase.
- Power off and verify safety before handling any wires.
- Label wires to prevent misconnection during reassembly.
- Test operation at low heat before full use.
- Maintain the cooktop to extend element life.